Project | DIY, low profile, stereo, microphone shock mount project
I used some spare items I already had and some materials I bought at local hardware stores to make a lightweight, good looking stereo microphone mount for my Microtech Gefell M300 microphones.
|
|
Posted by: Chuck Miller on October 16, 2013
I already had two unused Audix D-Mic clips http://www.audixusa.com/docs_12/units/DCLIP.shtml. I disassembled them and set aside the (2) black plastic gripping portions for the project. I also had a spare small diameter plastic microphone shock I purchased from Busman Audio http://www.busmanaudio.com to use to hold the microphone mount fixture. The rest of the items came from local hardware stores.
At Home Depot I purchased a 10" long 1/2" grey PVC riser pipe http://www.homedepot.com/p/Orbit-1-2-in-x-10-in-PVC-Riser-38090W/100130691#.Ul8UQFCUSAk. I cut two pieces out of it with a miter saw. The first section I cut was .75" long for the spacer between the black plastic microphone holders I separated from the Audix D-Mic clips. The second piece was 1.5" long. That section is used at the bottom of the fixture and is inserted into the shock mount that grips the fixture. I also bought a 3" long 3/8" diameter coarse thread nylon bolt http://www.homedepot.com/p/Unbranded-3-8-in-16-x-3-in-Nylon-Hex-Bolt-17248/202209605#.UlyglVCURSI from Home Depot and a matching nylon nut to hold the whole thing together when it's assembled.
While initially assembling the fixture I noticed it was difficult to keep the PVC spacers aligned and centered, as the bolt was 3/8" in diameter and the PVC pipe ID was much bigger. I bought (4) 9/16" x 5/16" x 1/8" #31 rubber O-rings at Ace Hardware (Danco STK NO 35745B) and put them on the nylon bolt to keep the bolt centered in the PVC pipe pieces (left). The O-rings can also be found at Home Depot: http://www.homedepot.com/p/DANCO-31-O-Rings-10-Pack-96745/100258186#.Ul1Z6tK3-bM The O-rings are less expensive at Home Depot too. When assembling everything the O-rings are a tight fit between the bolt and the ID of the PVC pipe, but that works to make everything really solid once it's all assembled.
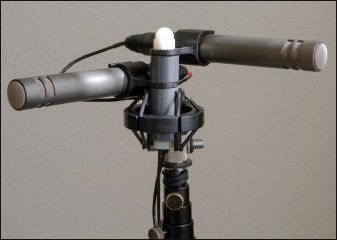
The finished mounting fixture installed in the shock mount is pictured on the left. It holds the microphones very securely and can be adjusted for various stereo microphone configurations by twisting the clips to change the angle at which the microphones are orientated. I dyed some of the nylon nuts and bolts I bought with Rit brand fabric dye (1 packet of black dye in 1.5 cups of water along with .5 cups of white vinegar, heated to just below boiling and left in the dye for 30 minutes) to make them black. You can see the results of that process in the photo. Photos © Chuck Miller
|
 I
am constantly looking for new ways to make my recording
gear
lighter, lower in profile and easier to carry & set-up
in the field. I have been using various clunky,
heavy metal microphone bars with two plastic shock
mounts attached to hold the microphones and space them
out properly for stereo recording. All the bars take up
too much space in my gear bag and are bigger and bulkier
than I would like. My goal was to make a smaller, less
bulky and lighter fixture to
hold two microphones for mounting in a stereo
configuration on a microphone stand.
I
am constantly looking for new ways to make my recording
gear
lighter, lower in profile and easier to carry & set-up
in the field. I have been using various clunky,
heavy metal microphone bars with two plastic shock
mounts attached to hold the microphones and space them
out properly for stereo recording. All the bars take up
too much space in my gear bag and are bigger and bulkier
than I would like. My goal was to make a smaller, less
bulky and lighter fixture to
hold two microphones for mounting in a stereo
configuration on a microphone stand.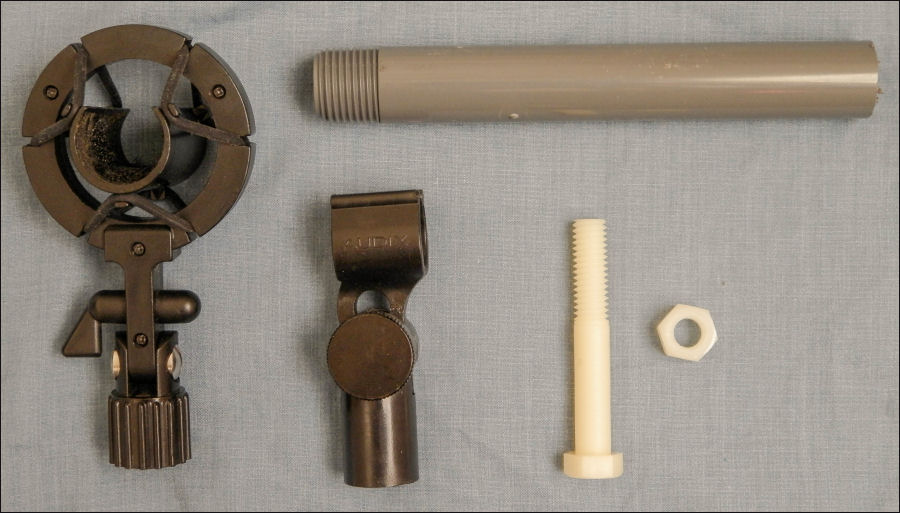
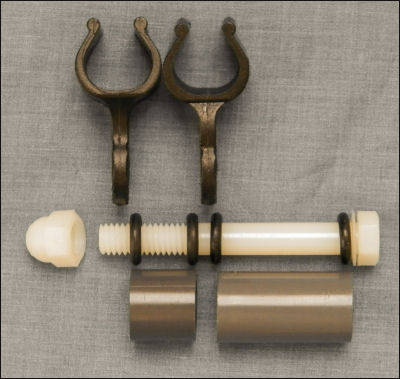 I had to drill out the small holes in the
two Audix microphone holders to 3/8" so the nylon bolt could go through them.
I had to drill out the small holes in the
two Audix microphone holders to 3/8" so the nylon bolt could go through them.
 I
also had to add some Velcro tape to the inside of the shock mount
cradle to make the fixture fit in there good and tight.
I
also had to add some Velcro tape to the inside of the shock mount
cradle to make the fixture fit in there good and tight.